AFO 222– Receive by barcode
222.1 Introduction
Like AFO 221 (‘Receive without barcode'), the purpose of AFO 222 is to register materials. The difference between registration in AFO 222 and normally received materials is that a barcode is linked to an item immediately it is received.
This barcode can then be used to identify the item. During cataloguing this barcode must always be input as the system requires a barcode to be linked to a call number. Whether the ‘receive via barcode' option is useful depends on the procedures your organisation follows.
As with normally received materials an item can only be registered via the barcode if the purchase order has been sent (i.e. the order status is ‘V'). Thus the receipt of items cannot be registered via barcodes if the order status is ‘I' (input) or ‘G' (locked). There are exceptions to this, approvals for example, whereby registering the receipt of materials automatically occurs at the same time the order is input.
222.2 Search for an order
After choosing this AFO a search screen is presented. This is the standard search screen that allows you to search by bibliographic details (first tab) or order number (second tab). After opening the record for the required title, you must double click on the order line. This takes you to the overview screen with orders, from where you can select an order.

The next screen gives an overview of all the items (copies / volumes) which have been ordered in the different sub purchase orders, i.e. an overview of all the titles and number of copies ordered in all the sub purchase orders. The most recent item appears at the top of the list.
The items are arranged by sub purchase order (which often coincides with the base fund).
When you search by order number, you are taken immediately to the receiving screen.

Columns on the screen
Vol. (copy).: the system displays a dash (-) for a one-volume item
Location: the location ordered for.
Budget: the base fund which will be charged.
Receipt: the date of receipt; the current date is the system default.
Barcode: the barcode linked to the item. A barcode is of course only displayed if an item has already been received which has been linked to a barcode.
. Run Id: When you use the facility for exporting acquisitions information, the Id of the export run will be displayed here.
Exported: When you use the facility for exporting acquisitions information, the data of the export will be displayed here.
Alternatively this column may contain the data of a manual claim.
Options on the screen
:Select an item and enter a barcode. If you input or scan a barcode this barcode will be linked to the item selected. Allocating a barcode also functions as registration of that item. See section 222.3.
:Select an item and click on this option to delete that item from the list.
: depending on parameters set in AFO 271 – Print parameters control – Receipt printing, you have the option to print receipt slips.
222.3 Receipt with barcode
: Select a line. After choosing this option the following form will be displayed:

The fields shown here are partly dependant on parameter settings in AFO 469 – Item Management Parameters – Data to be entered in Acquisitions.
Barcode and at least one of Sublocation code / Shelfmark classification are mandatory. See the Help on AFO 111 and AFO 423 for more information on adding item details.
When a custom barcode format has been defined in AFO 651 – Custom barcodes for automatic barcode generation, you can use the button . In that case the system will redisplay the form with the automatically assigned barcode.
When adding a new item you can place a [ (square bracket) in front of the barcode number. This ensures the new item will not be counted as “new” for SDI.
This only applies to entering the original barcode, for any subsequent barcodes for the same item a [ will be stored as data (if it passes an edit check).
For SSP such a barcode would also still be counted as a “new” entry.
So if you have ordered a new copy of an existing title (to replace lost or damaged copies) and you want to suppress these from being processed as new titles for SDI, (they are not new titles) then add the new copies with the [barcode - SDI will not see these new items as new titles now available.
Your system administrator may have set a Default shelfmark algorithm in AFO 469. If this is the case, the system will default the shelfmark based on the Default shelfmark algorithm. To generate a shelfmark using the shelfmark algorithm click on the button. A summary screen with shelfmark algorithms is displayed from which you can choose the correct one. You can also use the button. This will result in a summary screen with existing shelfmarks from which you can choose the correct one. You can modify the default data entered in this way.
The Inventory number field on these forms is protected (you are not allowed to enter data into this field directly). You must use the button to generate an inventory number, an input form will be displayed.
The Loan status field on these forms is protected (it contains the default status as defined in AFO 469 – Miscellaneous). You must use the button if you want to clear this status.
Please note
The , and buttons will only appear if the respective fields are defined in AFO 469 – Data to be entered, Data to be corrected.
After filing the item information, the receipt screen will be redisplayed:

You can now receive the next item.
Note
When the relevant parameter in AFO 272 – Acquisitions parameter control – Miscellanous has been set, any items received with barcode via AFO 222 will get the ‘in transit' status when they are destined for a location other than where they were received in Acquisitions. In such cases a message will appear:
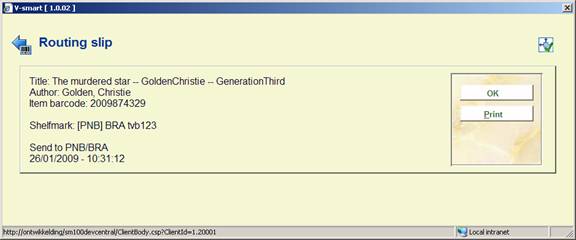
Just click to acknowledge the message or click to produce a routing slip.
Once you have finished receiving you can return to the overview screen of the order:

Depending on whether or not you have received all items, the Receipt status (line 8) will be Completed or Partially. See the Help on AFO 221 for more details on the options of this screen.
Note
Budget information in the partial order can be updated after receipt, as long as the order has not been invoiced yet.